마인크래프트 모드 만들기는 보통 forge로 진행한다.
마인크래프트 FORGE모드 개발을 하려면 세 가지가 필요하다.
1.IDE(통합 개발 도구)
2.forgeAPI
3.자바 JDK
1. 먼저 IDE는 JETBrain사의 intellij를 사용할 것이다. intellij는 https://www.jetbrains.com/ko-kr/idea/여기에서 다운로드하면 될 것이다. 2024년도 1월 즈음부터 intllij에서 한국어지원도 되기 때문에 이제 쉽게 사용할 수 있을 것이다. 유료버전이 있고 무료버전이 있는데 무료플랜으로 시작하면 된다. 아이디를 먼저 만들고 다운 후 intellij에서 로그인하면 될 것이다.
IntelliJ IDEA – Java 및 Kotlin을 위한 최고의 IDE
www.jetbrains.com

2.ForgeAPI다운 방법
forge사이트에 접속한다. 그 후 자신이 원하는 버전을 선택한다(필자의 경우 1.20.1 버전을 사용한다. 이유는 1.20.2부터는 마인크래프트 라이브러리의 큰 변화가 생겨서 정보 찾기가 어렵고 개발도 어려워지기 때문에 1.20.1을 추천한다.)

그 후 이 화면에서 mdk를 다운로드하면 되는데 Recommanded버전을 받는 것이 좋다.
다운로드한 mdk를 자신이 원하는 폴더에 옮겨준다.
그 폴더에 방금 다운로드한 mdk를 압축해제해 준다.
그러면 여러 파일이 생길 것인데 일단 두고 자바 다운로드하으러 간다.
3. 자바 JDK다운로드
https://adoptium.net/temurin/releases/
Latest Releases | Adoptium
adoptium.net
사이트에 접속하면 여러 버전의 자바가 보일 것이다.
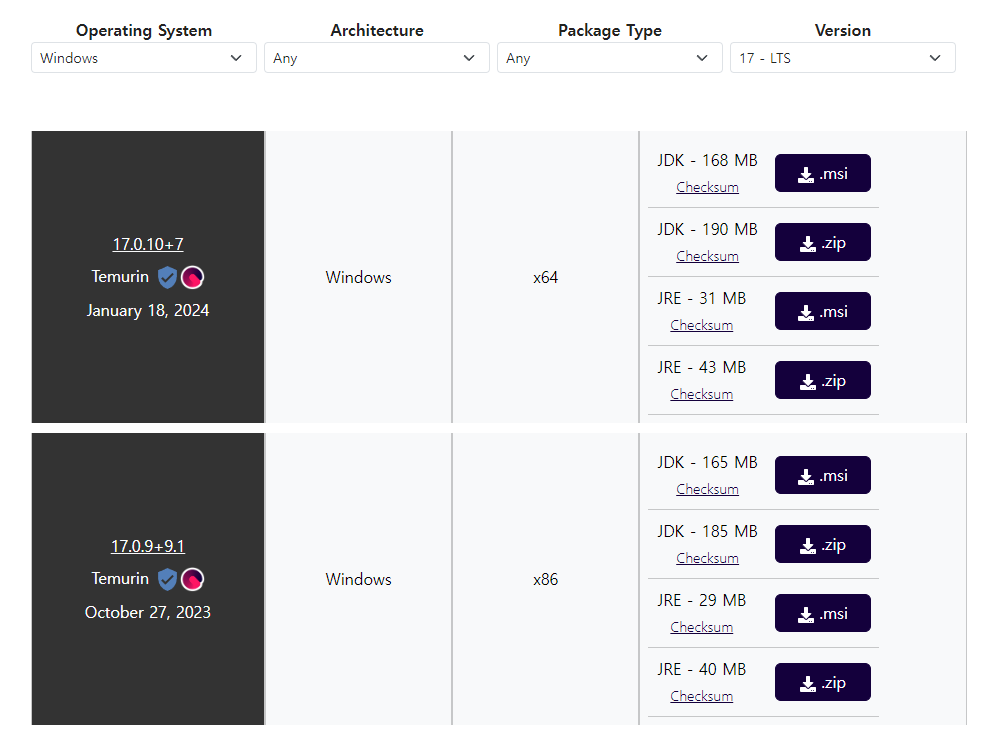
이렇게 설정해서 17 버전 LTS버전을 다운로드한다. msi이 설치기 다운로드이므로 이걸로 다운로드하면 된다.
이제 모딩을 위한 초기 설정을 시작해 보자!
먼저 intellij에서 mdk를 압축해제해 놓은 폴더를 찾아야 한다.
intellij를 켜고 →열기 → mdk를 압축해제해 놓은 폴더(아마 폴더 아래에 표시가 되어있을 것이다. gradle실행가능 표시이다) →그렇게 열었으면 아마 gradle설치를 시작할 것이다. 터미널을 열어보거나 오른쪽아래에서 작업진행바가 실행되고 있으면 잘 되는 것이다.(사람마다 설치 속도가 다르다. 30분에서 3분까지 천차만별이다.)
→설치가 끝나면 오른쪽 위의 설정 표시를 눌러서 프로젝트 구조를 누른다.(한국어 설정했다는 기준)
→다시 설정 버튼 누르고 설정으로 들어간다. →빌드, 실행, 배포에서 빌드 칸을 찾는다. →gradle칸에 들어가서 Gradle JVM버전을 확인한다. 프로젝트 SDK로 되어있으면 문제없다.
이제 인텔리제이 개인설정을 해볼까 한다. 이유는 마크 모드 개발 할 때 불편한 것들이 있는데 미연에 방지하기 위함이다.

위의 점세개를 눌러서 트리 모양을 들어가서

이 상태로 만들어준다 이렇게 하면 중간 패키지도 볼 수 있기에 편하게 개발할 수 있다.
처음 상태는 com.example.examplemod로 패키지가 되어있을 텐데 나는 내 취향대로 패키지명과 클래스 이름을 바꿨다.
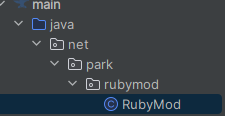
examplemod안의 내용도 수정했다. MOD_ID로 바꾼 건 정말 개인적이므로 안 바꿔도 된다.
다른 것들은 모드개발에 필요 없는 부분이므로 다 삭제했다.
config클래스도 삭제해도 된다.
삭제하거나 이름을 바꿨으면 수정해 줘야 된다
@Mod(RubyMod.MOD_ID)
public class RubyMod
{
    // Define mod id in a common place for everything to reference
    public static final String MOD_ID = "rubymod";
    // Directly reference a slf4j logger
    private static final Logger LOGGER = LogUtils.getLogger();
    public RubyMod()
    {
        IEventBus modEventBus = FMLJavaModLoadingContext.get().getModEventBus();
        modEventBus.addListener(this::commonSetup);

        MinecraftForge.EVENT_BUS.register(this);
        modEventBus.addListener(this::addCreative);


    }

    private void commonSetup(final FMLCommonSetupEvent event)
    {
        // Some common setup code
        LOGGER.info("HELLO FROM COMMON SETUP");

    }

    // Add the example block item to the building blocks tab
    private void addCreative(BuildCreativeModeTabContentsEvent event)
    {

    }

    // You can use SubscribeEvent and let the Event Bus discover methods to call
    @SubscribeEvent
    public void onServerStarting(ServerStartingEvent event)
    {

    }

    // You can use EventBusSubscriber to automatically register all static methods in the class annotated with @SubscribeEvent
    @Mod.EventBusSubscriber(modid = MOD_ID, bus = Mod.EventBusSubscriber.Bus.MOD, value = Dist.CLIENT)
    public static class ClientModEvents
    {
        @SubscribeEvent
        public static void onClientSetup(FMLClientSetupEvent event)
        {
            // Some client setup code
            LOGGER.info("HELLO FROM CLIENT SETUP");
            LOGGER.info("MINECRAFT NAME >> {}", Minecraft.getInstance().getUser().getName());
        }
    }
}
이제 모드 개발 시에 이름이 그지 같은 것을 방지하기 위한 gradle.properites를 수정해 보자
## Mod Properties

# The unique mod identifier for the mod. Must be lowercase in English locale. Must fit the regex [a-z][a-z0-9_]{1,63}
# Must match the String constant located in the main mod class annotated with @Mod.
mod_id=rubymod
# The human-readable display name for the mod.
mod_name=RubyMania
# The license of the mod. Review your options at https://choosealicense.com/. All Rights Reserved is the default.
mod_license=MIT
# The mod version. See https://semver.org/
mod_version=0.1-1.20
# The group ID for the mod. It is only important when publishing as an artifact to a Maven repository.
# This should match the base package used for the mod sources.
# See https://maven.apache.org/guides/mini/guide-naming-conventions.html
mod_group_id=net.park.rubymod
# The authors of the mod. This is a simple text string that is used for display purposes in the mod list.
mod_authors=Park
# The description of the mod. This is a simple multiline text string that is used for display purposes in the mod list.
mod_description=Example mod description.\nNewline characters can be used and will be replaced properly.
나는 이렇게 수정했다. 라이선스는 꼭 검색해 보고 설정할 수 있도록 한다.
https://parchmentmc.org/docs/getting-started
Getting Started
## Choose a version Parchment mappings are provided in [three flavors][exports-info], but most users will only really need to use the _release_ exports. The latest version of the release export for a particular Minecraft version can be found in the version
parchmentmc.org
이 사이트에 접속한 뒤

maven라인을 복사해서 settings.gradle에
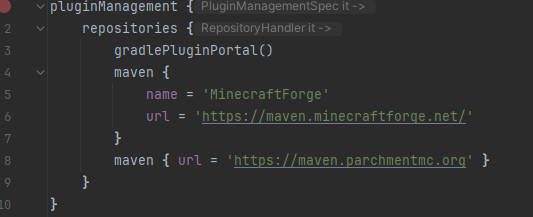
이런 식으로 추가해 주며 된다.

저 id라인을 복사해서 build.gradle에
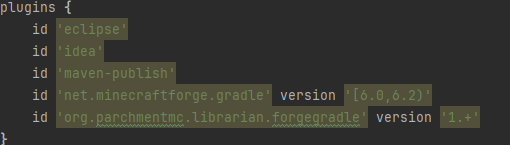
이렇게 추가해 준다.
gradle.properties안의 mapping_channel과 mapping_version을 바꾼다.

버전의 경우 아래를 참고해서 작성하면 된다.

다했다면 오른쪽 위의 이 버튼을 눌러서 적용해 준다.


왼쪽의 gradle(코끼리) 버튼을 눌러서 runClient를 실행해 본다.
오류 없이 잘되면 마크 모딩을 위한 forge설치 및 준비가 끝난 것이다.
'프로그래밍' 카테고리의 다른 글
| 마인크래프트 1.20 forge 모딩 - 이벤트 이해 (2) | 2024.01.05 |
|---|